Air pruning beds are a propagation method that allows many trees to be grown in a small area, while creating a healthier root system for improved transplant success. The basic concept is a container with a mesh bottom exposed to air. When a taproot senses air it branches, creating a fine mesh of feeder roots with greater surface area. At the end of the growing season these trees can be transplanted with less shock than if a long taproot was twisted in a pot, or severed from the ground.
There are many different designs and methods and here I share two of designs that have been refined for my growing conditions. I have a south facing unheated greenhouse. While the season extension is wonderful, I find it beneficial to move the beds outside in the heat of summer. This helps mitigate heat stress, stem strengthening from wind, rain watering and acclimation to outdoor growing conditions.
I utilize pressure treated 2x material and keep in consistent increments of 16 or 24 inches for material efficiency and portability. I use a 24″ wide coil of 1/2″ hardware mesh for the bottom screen and also for the rodent cage.
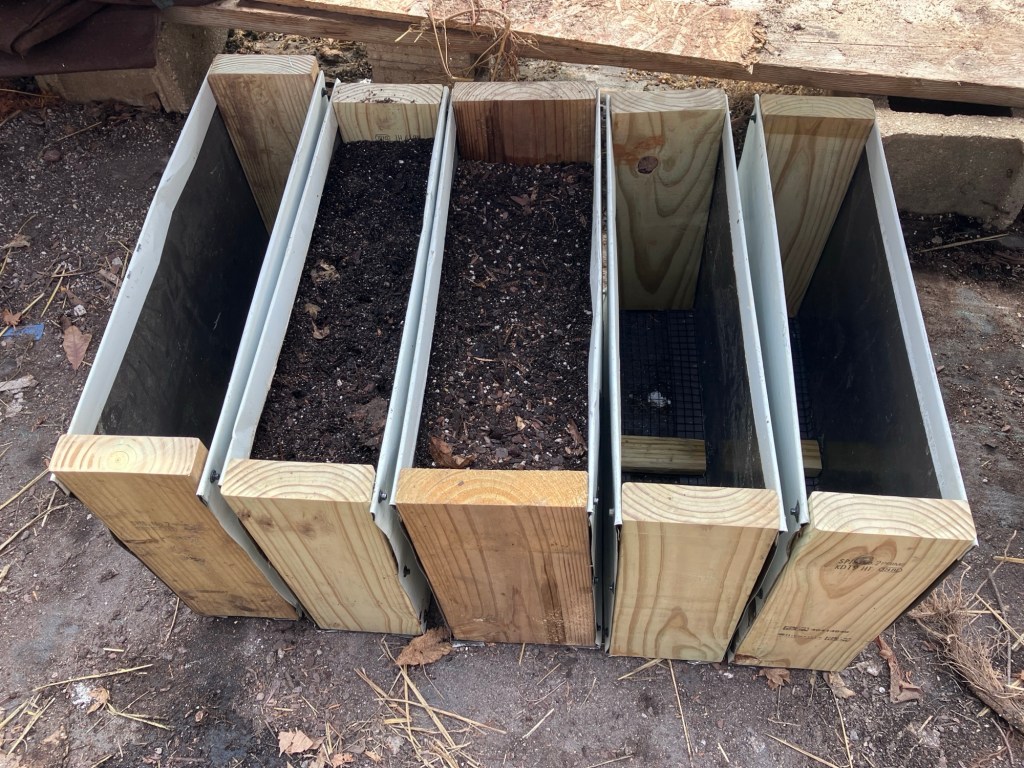
Traditional Design
24″ Long x 16″ wide 11″ depth
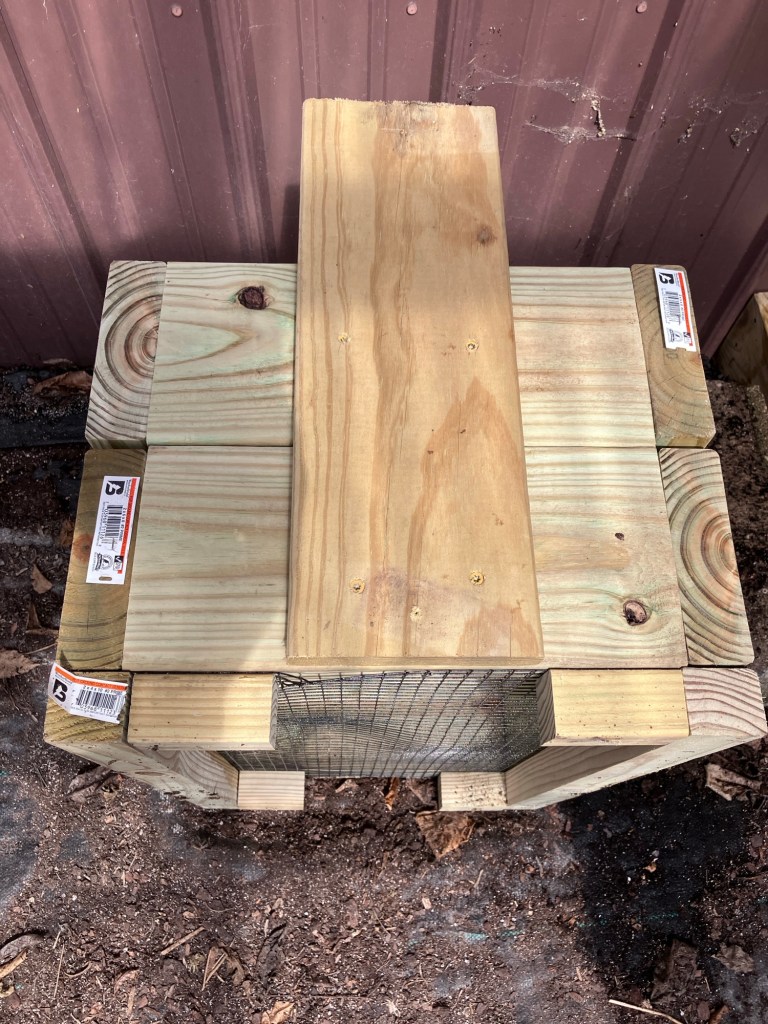
This size is still portable, but obviously heavier, maybe 70-80#. I’ve found strategic placement of the ripped 2x bottom support material makes a nice handle for the dead lift. These consistent dimensions also allow me to stack multiple boxes under a single 4x2x2 foot protective mesh top. This utilizes lumber and materials in an efficient manner.
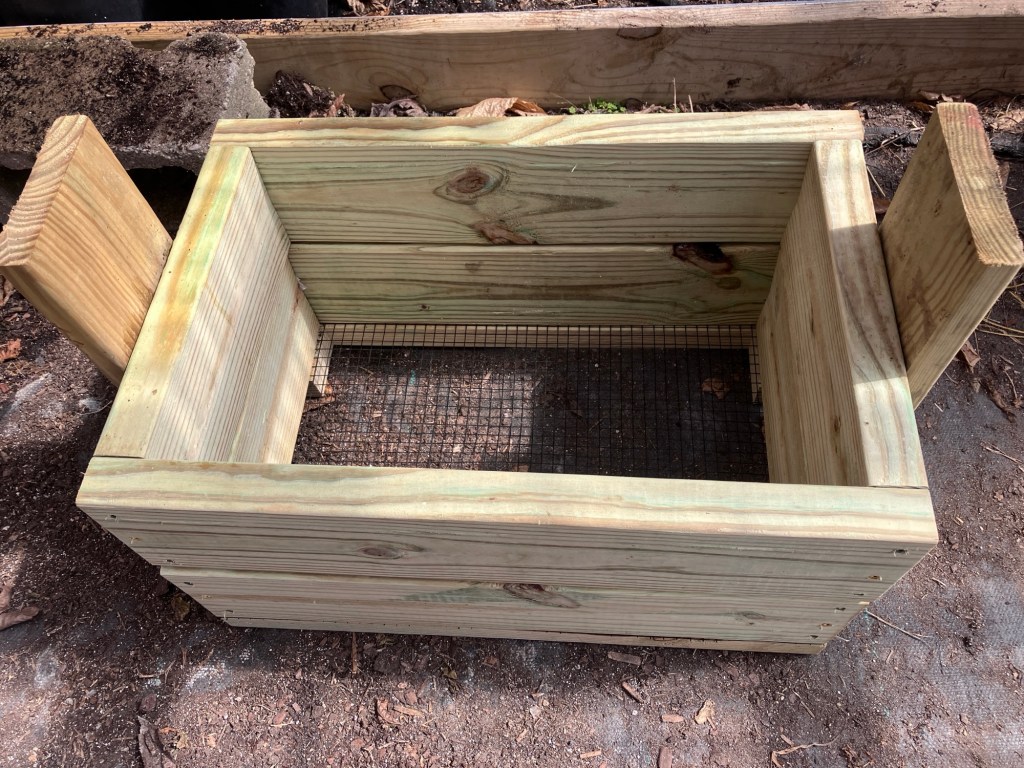
I use stock 2×6 for the sides, which creates about a 10″ soil depth. If one wanted a deeper box you could utilize one or two 2×8 instead. I use 3″ deck screws for assembly, but also include one 4″ as screwing into the end grain isn’t as strong a hold.
The outer boards are cut to 24″ and the inner boards at 13″ to create the overall 24×16″ outer dimension. I assemble the two boxes, cut the wire mesh and staple it to the bottom. Wire mesh can be purchased at home improvement or farm stores in many quantities. I ordered a 50ft roll of vinyl coated mesh from vevor, which I like working with better than the uncoated types, but functionally isn’t worth specifically sourcing versus a local purchase.
I rip 2×4 to 1.75″ width for securing the mesh plus elevating the box to allow for the air gap. It is important to leave some gaps to allow for air circulation. I’ve found that leaving and hand width gap on the short side, allows a hand hold for lifting the box from the ground.
The side pieces are screwed into each set of boxes for stabilizing the set as well as keeping the mesh cage in place. These can be unscrewed at the end of season with the top half of the box pulled off to facilitate easier and more delicate tree removal.
Material cost for one box is about $30. It holds 12 gallons of media. It will hold 40 +/- nuts, depending on spacing. I’ve concluded this ends up about a $1/tree cost, however the box lasts multiple seasons, making the cost in subsequent years very low.
“Suitcase Style”
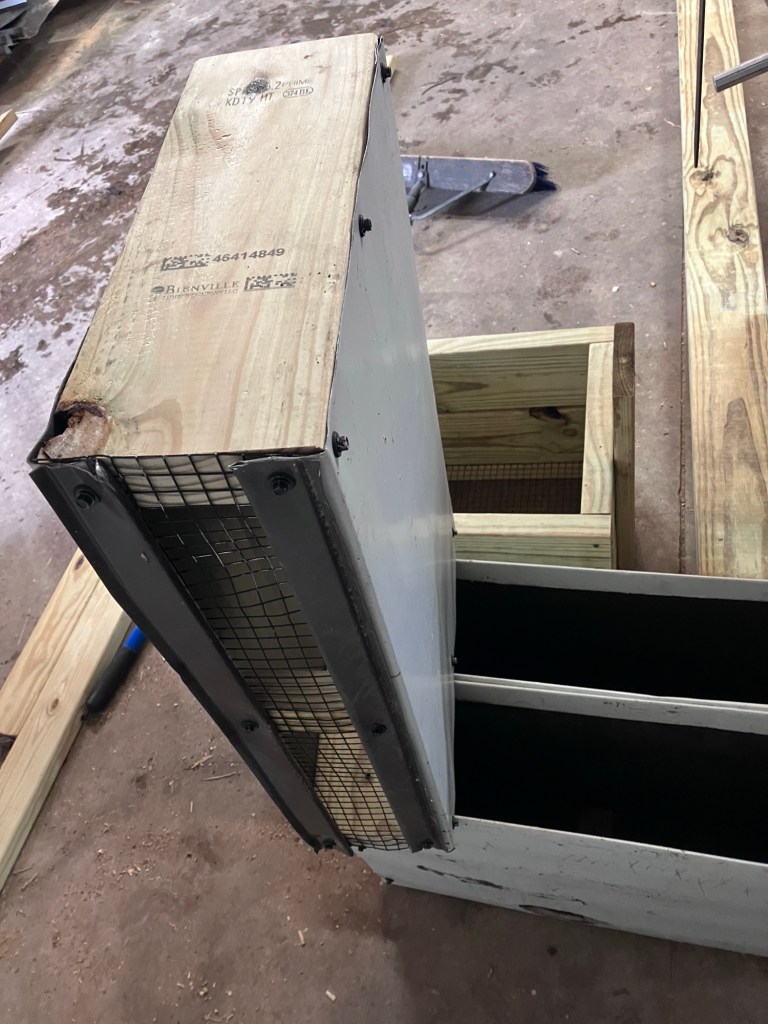
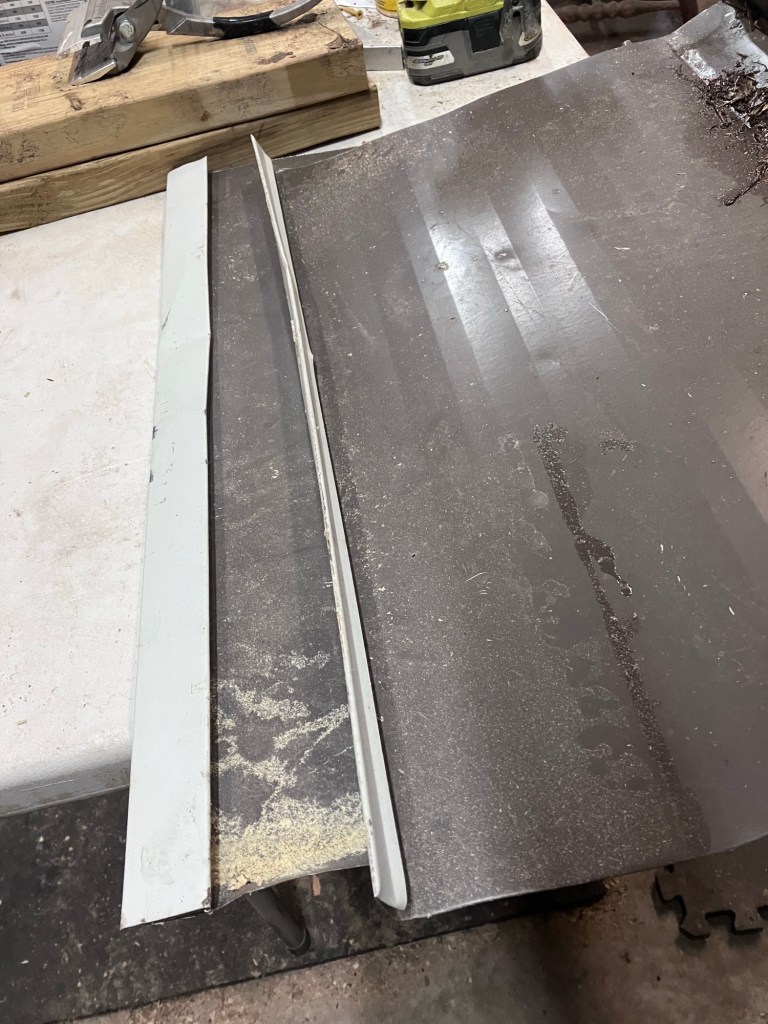
This is a newer design observed from the tree propogation Facebook page. The smaller boxes are more portable, have great stackability and can also be built for nice root depth. Cost and functionally strong side material was a conundrum. After pondering several options I came up with my used pile of standing seam roofing. I fold one seam over for a top “rib” for strength. The bottom seam creates a nice contour to support the mesh on the bottom. The entire assembly utilizes roofing screws and I can undo the top four to peel off he side back for easier tree removal.
I am trialing both 2×6 and 2×8 sizes for various seed sizes and compare moisture retention. The height is 16” as that matches the roofing profile. Filled with damp media the 2×6 is about 40# and the 2×8 was about 50#. My plan is to utilize these for keeping sets of both grafted trees and started nuts separated by source.
Soil/Planting Media
There are many different recommendations for planting media. The “standard” mix recommended by TACF is 1/3 each peat moss, pearlite and vermiculite.
I have had great results utilizing Morgan Composting product called Nursery Doo. It utilizes compost, triple processed bark mulch, peat moss plus sulfur for pH adjustment. It is available in 1.5yd bulk totes for a very reasonable price, $150-200, depending on delivery charges. The compost adds natural microbes and living biology that are critical for healthy root systems. This is one of the reasons many “homemade” recipes call for forest floor leaf litter and this component shouldn’t be overlooked if one wants thriving trees.
ACs thrive in acidic, well drained soil which is important to keep in mind if purchasing box store soil mixes or formulating your own. Typically typical veggie type potting soils aren’t as well drained so mixing in additional mulch, course perlite or sand is beneficial for ACs. I also add some more sulfur to lower the pH.
Fertilizer
There are many schools of thought on fertilizer. I’m not very regimented in my system, but have had good success with organic meal type fertilizers. I like these products because they offer a slow breakdown of nutrients over time providing consistent nutrients and minimal risk of over application. They are usually a bone, feather and/or blood meal based product. My local farm coop carries Midwest Bio Ag and I utilized their Veggies NKO 6-1-6 last season. Another decent option is Espoma Plant Tone, which can be found at almost any big box store.
There are many recommendations and good results utilizing Osmocote slow release fertilizer. I feel it is overpriced for the quantity of conventional nutrients plus there is some debate if the polymer coating is truly biodegradable or maybe another form of micro plastics.
Whatever form of fertilizer utilized it is important the trees to not get a nitrogen boost late summer as this can push new growth that doesn’t have time to harden off before winter.
Water
ACs evolved to grown on the limestone based mountains and ridges of the Eastern US and as such they don’t tolerate prolonged “wet feet”. Soil should be allowed to dry between waterings. Some mild water stress also helps stimulate a more robust root system. Be sure to use rain or unsoftened well water, otherwise you risk salt accumulation and/or pH issues.
Light
If seedlings are started indoors they do better with some artificial light. I use 3 foot LEDs, which are inexpensive and easy to adjust the height as seedlings grow. Without enough hours of light the trees develop elongated and spindly. Conversely too much light exposure can burn the leaves.
The latter is very important during the outdoor growing season. In my experience they perform better in partial sun or utilizing shade cloth. Full outdoor sun seems to burn the leaves during the first year. Since ACs evolved as a forest tree this makes sense they would tolerate shade as they grow up and out of the canopy.
These factors are important to keep in mind if seedlings are being hardened off from an inside to and outside environment. I’ve made the mistake of rushing this process and stunting growth. Equate process the same as a mid winter pale Michigander plopped down in the Florida sun for Spring Break trying to not get sunburned.
Other Container Options
Pots
I’ve grown many trees in traditional pots. Advantages are they’re easy to transport, reusable and inexpensive (or free from friends, recycling centers or spring clean up). I feel true one gallon is the minimum size, two gallons being better and the deeper you can find them the better. The issue I’ve found is generally a larger container gets wider and the height doesn’t change much.
Grow Bags
I up potted some trees into five and ten gallon grow bags last fall, so don’t have much data to relay yet. Root Pouch, is the most popular brand. I find their numerous product lines difficult to differentiate between. I also have some from AM Leonard, to compare long term durability.
Grow bags are convenient to move, if one utilizes a size that has handles. They are air permeable so, theoretically the roots should air prune. I don’t think this will truly be the case if the lower surface is in contact with the ground, but I do suspect they will offer an advantage over the same sized plastic pot. I would like to trial some first and second year trees in one and three gallon sizes to compare results.
“Tree/DeepPots”
These are a great option for container growing, with the benefits of a deeper root system. I’ve used the 4″ square by 14″ deep pots. I found the soil dried out readily, so it would be important to modify soil for more water holding capacity or ensure a consistent watering schedule, especially in summer heat. Stuewe offers a massive selection at the best bulk prices. However they’re west coast based and shipping often ends up as LTL freight. So if you can use a pallet of them its a good deal. Otherwise I’d suggest Greenhouse Megastore for smaller quantities.
Protection
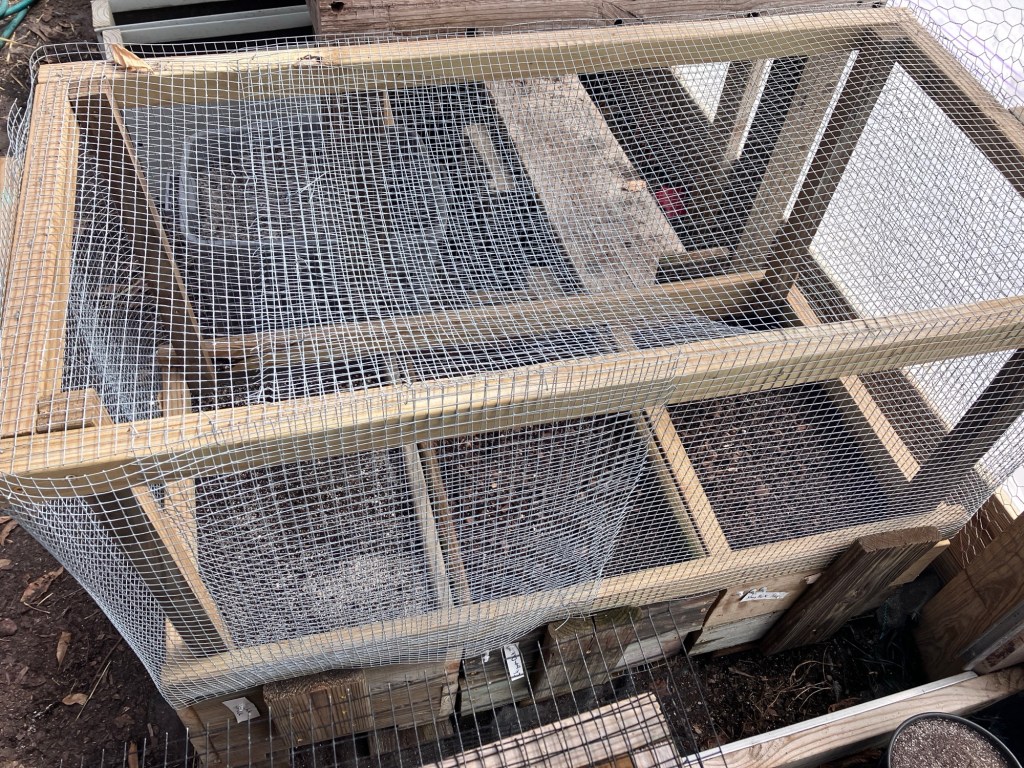
Every rodent and forest creature loves ACs so the nuts need protection at all times. I’ve had chipmunks and red squirrels strip my beds clean of freshly planted nuts as well as seedlings, several months old. The wire mesh cages are a must.
Last season I went ahead and removed the nut after about 6 weeks of growth once the trees were pushing their second set of true leaves. My understanding is that at this point the nut has provided all its energy to the tree and is no longer needed since the leaves can photosynthesize enough energy needs. I gently removed the small layer of soil to expose the nut and clipped off the two attachments with sharp scissors before discarding the nut. I didn’t have any predation issues after this.
Chemical/Olfactory Deterrents
For the initial nut planting and first year growth stages I have tried several products, but none will deter nut predation to my satisfaction. I put both Plantskydd and Bonide Repels-All on my beds and still had nuts consumed.
Wire Tree Cages
I have immense deer and somewhat lesser rabbit protection for forest/field planted trees. Tree cages from welded wire fence, secured with T posts are the gold standard. I found these are decent with some drawbacks. The per tree up front price gets expensive when buying t posts and carrying material out in the woods for planting is unruly. I’ve seen others use sections of rerod, bamboo or wooden stakes.
I feel the 2×4″ hole size at 48″ height of welded wire is the most economical. This size doesnt inhibit vole bark chewing in the winter, but seems to keep most rabbits at bay, compared to the larger sized fencing. I’ve also trialed some of my 1/2″ hardware mesh, but this isn’t as sturdy for buck rub protection. I’ve seen some folks use a inner circle of hardware mesh or trunk wrap in unison with the outer fencing.
Tree Tubes
I’ve had three years utilizing Plantra tree tubes in their 6 foot size. Price varies with quantity but I could get the tube plus fiberglass pole for $10-12 per tree. I anticipate the fiberglass pole should last some time for reuse and it theoretically flexes to allow the tree trunk to straighten naturally in the wind. This set up is much easier to carry a bunch out into the woods and they take two minutes to apply. The tall height means the tree emerges above deer browse height. They also provide a micro greenhouse environment for sun and wind protection plus moisture retention.
However tree tubes have a few drawbacks. Late winter I need to remove the tube and prune any lower branches, leaving a single whip trunk, which is time consuming. Once the tree emerges and branches from the top of the tube it is impossible to slide the tube off. By design the tube stays on until trunk diameter separates the perforations in the tube, at which point it is large enough to resist buck rubs. My solution for easier removal will be a strategic slit between the twist tie holes to take the tube off each spring. There also is some concern with trunk rub at the exit point in strong winds. Their new design appears to alleviate this.
TACF reports not liking tree tubes because they create “top heavy” trees that tip over due to poor trunk strength. My trees aren’t large enough to report on this, but my understanding is the flexible fiberglass pole allows the trunk to be stressed by the wind, growing stronger and preventing this. Time will tell.
DEER PRO
This is my favorite project and a game changer for my plantings. I use Deer Pro Winter exclusively. Its pricey, but if you can find a wholesale account it was a bit over $200 per jug as opposed to over $400 direct. Many of the landscape/maintenance companies use it for spraying plants/cedar hedges at the seasonal lake homes up here instead of the traditional wrapping in burlap or deer fence. One can cover many trees in a short amount of time with a backpack sprayer. I also dip my seedlings in it before planting to deter predation for the spring and summer, hoping they get a better chance for second season growth.
My Optimum solution
I enjoy the experimentation and evolving methods with tree propagation. I don’t think there is a “one size fits all,” due to varying priorities, conditions, resources and goals of various growers. I am a huge proponent of air pruning beds. Others have decent luck with direct seeding or pot growing.
I really like the ease and protection of tree tubes. They allow me to plant out many trees in a short window, while working solo. They also help locating the trees I’ve planted in the woods in subsequent seasons and years. The pruning and trunk development are deterrents. Once I run out of my 6′ stock, I think I will switch to a shorter tube and then keep up on chemical control with Deer Pro until the are above deer browse.
